

Combat Training Equipment for Home Use: 7 Essentials
Table of Contents
- Comparing the Best Combat Training Equipment for Home Use
- The Best Heavy Bags for Home Use: Our Top Picks
- How to Set Up a Home Boxing Gym: A Step-by-Step Guide
- Why You Need Martial Arts Training Mats for Home
- Noise Control and Mounting for Home Combat Training
- Maintaining Your Combat Training Equipment for Longevity
- Conclusion: Build Your Home Combat Training Setup
- Frequently Asked Questions
Last Updated: September 6, 2026
Building a serious home training space is about more than clearing a corner of the garage. The right combat training equipment turns sporadic workouts into consistent, high-intensity sessions. At Combat Build Supply, we equip enthusiasts and professionals with durable gear, and this guide breaks down the essentials you need to build a setup that lasts.
The mistake most people make is buying a single heavy bag and calling it a gym. A functional home setup pairs a quality striking surface with proper flooring, mounting hardware, and conditioning tools. Below, we show you how to select and combine these pieces, and cover keeping noise down in shared spaces and maintaining your gear.
Comparing the Best Combat Training Equipment for Home Use
Combat training equipment falls into distinct categories. The core of any setup is the heavy bag for power and technique work, but you will also want a speed bag or double-ended bag for hand speed and timing. Supporting gear like jump ropes, medicine balls, and resistance bands build the cardiovascular conditioning and functional strength that fighting demands.

A common mistake is prioritizing one category while neglecting the others. Fighters who only punch the heavy bag develop power but lack the footwork and rhythm a double-ended bag develops. A balanced home gym pairs one primary striking tool with at least one conditioning implement.
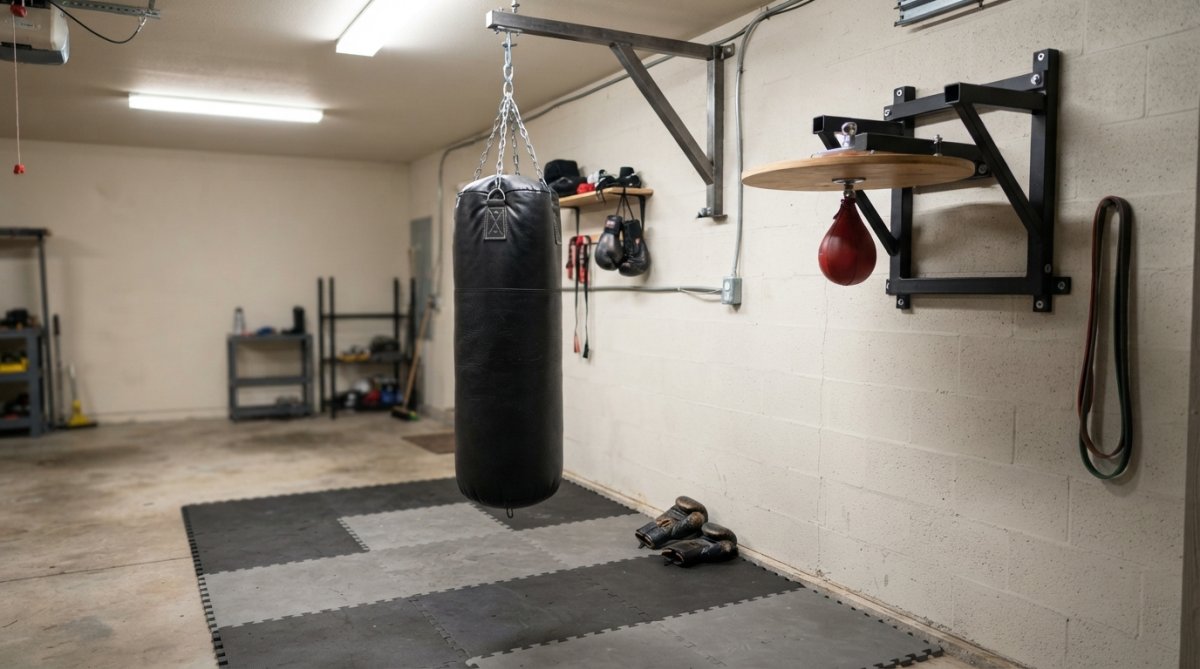
The table below summarizes how the core equipment categories fit together in a home setting:
| Equipment Type | Primary Purpose | Best For | Space Requirement |
|---|---|---|---|
| Heavy Bag | Power, technique, combinations | Core striking practice | 3 x 3 ft floor, 8+ ft ceiling |
| Speed Bag | Hand speed, rhythm, shoulder endurance | Boxing coordination | Wall or ceiling mount |
| Double-Ended Bag | Timing, accuracy, head movement | Reflex development | 4 x 4 ft open area |
| Thai Pads / Mitts | Partner drills, accuracy | Pad work with a partner | Minimal, handheld |
| Jump Rope | Footwork, cardio conditioning | Warm-ups, HIIT intervals | 6 x 6 ft clearance |
The Best Heavy Bags for Home Use: Our Top Picks
The heavy bag is the centerpiece of any home combat training setup, and choosing the right one comes down to durability and weight. Our top pick for most home users is the Panama 45D Heavy Punching Bag from Sting Sports USA, priced at $449.00. This commercial-grade bag uses proprietary Panama material designed to withstand extreme temperatures from -20°C to 70°C, making it suitable for garages and outdoor covered spaces.

What separates a quality heavy bag from one that falls apart is the construction detail. The Panama 45D features heavy-duty D rings and premium sandwich belt reinforcements, ensuring the bag stays securely mounted even during intense training sessions. The clean rag filling provides a consistent striking surface, and you can choose from 120 cm, 150 cm, or 180 cm lengths depending on your height and training style.
For those who prefer a slightly slimmer profile, the Panama 35D Heavy Punching Bag at $400.00 offers the same commercial-grade durability in a more compact form.

How to Set Up a Home Boxing Gym: A Step-by-Step Guide
Setting up a home boxing gym takes planning, not just purchases. The difference between a setup that lasts and one that fails is almost always in the mounting hardware and structural details. Before you buy anything, measure your space and confirm your ceiling height. A heavy bag needs at least 8 feet of clearance from the floor to the mounting point, and roughly 3 feet of clear space on every side to move around it safely. But clearance is only half the equation, the other half is understanding what your ceiling and walls can actually hold.
Step 1: Choose your mounting method based on structure, not preference.
A ceiling mount distributes the bag's weight through the joists and provides the most natural swing. If you have an unfinished garage ceiling with exposed joists, bolt directly into the wood using 3/8-inch or 1/2-inch grade 5 bolts with washers and lock nuts. If you have a finished drywall ceiling, locate the joists with a stud finder and drill pilot holes before mounting. Never rely on drywall anchors alone, a 100-lb bag swinging generates forces of 300 to 500 lbs at the mounting point, so the hardware must be rated for that dynamic load.
A wall mount works well if you have limited ceiling access, but it changes the bag's movement pattern. Wall mounts use a cantilevered arm that extends 24 to 36 inches from the wall and require mounting into vertical studs with lag bolts. The trade-off is that a wall-mounted bag swings in a more restricted arc, which is fine for boxing-focused work but less ideal for Muay Thai or kickboxing where you need to circle the bag. Wall mounts also transmit more vibration into the wall structure, making them noisier for neighbors than ceiling mounts.
Freestanding bags avoid structural concerns entirely, but they come with their own constraints. Most units cap out around 100 to 150 lbs, limiting their stability for hard kicking. The base needs to be filled with sand or water, sand provides more stability but makes the unit nearly impossible to move; water is easier to drain but allows more wobble. If you go the freestanding route, look for a base at least 24 inches in diameter with a low center of gravity.
Step 2: Install protective flooring before you hang anything.
Interlocking floor tiles or tatami mats protect both your joints and your subfloor. This step is non-negotiable if you train barefoot or in thin-soled shoes, as repeated impact on concrete leads to stress fractures and joint pain. For striking-heavy training, 1-inch thick EVA foam tiles rated for martial arts are sufficient (peer-reviewed research). For BJJ or wrestling, you need denser tatami mats, typically 1.5 to 2 inches thick, that resist tearing under friction. Cover at least a 6 x 6 ft area for striking, and expand to 8 x 8 ft or larger for ground work. Tape the seams with mat tape to prevent them from separating mid-drill.
Step 3: Set up your conditioning station with a logical flow.
Keep a jump rope, medicine ball, and resistance bands within arm's reach of your bag. High-intensity interval circuits that alternate 3-minute bag rounds with 1-minute jump rope intervals will dramatically improve your cardiovascular conditioning. Arrange your space so the bag is central, the mats extend at least 2 feet beyond the bag's swing radius, and the conditioning tools sit along the perimeter where they are accessible without interrupting your movement.
Step 4: Position your speed bag platform at the correct height and angle.
The speed bag platform should be mounted at eye level or slightly above, typically 60 to 70 inches from the floor. The platform must be anchored into wall studs, not drywall, because the constant rhythmic impact will loosen any mounting that is not structurally sound. The Fold Away Speed Bag Platform at $143.99 solves space constraints by folding flush against the wall when not in use, with six adjustable height levels. When mounting, use a level to ensure the platform is perfectly horizontal, a tilted platform will cause the bag to drift to one side and hit the platform frame on every rebound.
Step 5: Test your setup with progressive intensity.
Hang the bag, throw a few warm-up rounds at 50% power, and check for excessive swinging, mounting noise, or floor slippage. Then increase to 80% power and repeat the check. Listen for creaking from the mount, watch for the bag's chain twisting, and verify the bag does not swing so far that it hits walls or nearby equipment. If the bag swings excessively, you may need a swivel with a shorter drop or a bag with a narrower profile. A 10-minute test now saves you from discovering a problem mid-workout.
Why You Need Martial Arts Training Mats for Home
Martial arts training mats are not a luxury, they are a safety requirement. Falling, sprawling, and performing ground drills on hard flooring causes injuries that sideline training for weeks. Tatami mats and interlocking floor tiles provide the impact absorption needed for safe solo drilling and partner work. A common approach is covering a 6 x 6 ft area with 1-inch thick interlocking tiles, which balances protection with portability.
The type of mat you choose depends on your discipline. BJJ and wrestling practitioners need denser, higher-quality tatami mats that resist tearing under friction. Striking-focused athletes can use standard interlocking tiles, which provide adequate cushioning for footwork drills and light falls. Whichever you select, ensure the mats are at least 1 inch thick and rated for martial arts impact, not just general fitness flooring.
Noise Control and Mounting for Home Combat Training
Noise is the single biggest factor that gets home gyms shut down, especially for apartment dwellers. The thud of a heavy bag transmits through walls and floors, and the rhythmic tapping of a speed bag carries through shared structures. Addressing noise before it becomes a complaint is far easier than defending your setup after the fact.
Understand how impact noise travels.
There are two distinct types of noise from combat training: airborne noise and structure-borne noise. Airborne noise is the sound of the punch connecting with the bag, the thud itself. Structure-borne noise is the vibration that travels from the bag through the mounting hardware into the ceiling joists, then radiates through the building frame into adjacent rooms. Structure-borne noise is the bigger problem because it is harder to block and travels farther. You can muffle airborne noise with foam panels, but structure-borne noise requires isolating the vibration at the source.
Isolate the mounting point.
For ceiling-mounted bags, use isolation mounts with rubber bushings that absorb vibration at the attachment point. A standard ceiling mount bolts directly to the joist, sending every punch's shockwave straight into the wood. An isolation mount inserts a rubber or neoprene bushing between the metal bracket and the joist, absorbing a significant portion of that shockwave before it reaches the structure. These mounts typically cost $30 to $60 more than standard mounts, and they are worth every dollar if you share walls or floors with neighbors. Look for mounts rated for at least 300 lbs of dynamic load and made with 70-durometer neoprene bushings, softer bushings absorb more vibration but may allow excessive bag swing.
Decouple the bag from the floor.
For freestanding setups, place a dense rubber mat under the base to prevent the stand from vibrating against the floor. The Heavy Duty 2 Bag Stand at $574.99 supports up to 300 lbs and uses 3-inch metal tubing, but even the most stable stand transmits noise if the base sits directly on a hard floor. A 1/2-inch thick rubber stall mat placed under the base absorbs vibration and prevents the metal from resonating against concrete or wood. If you are on a second-floor apartment, this is not optional; it is the difference between a quiet setup and one that vibrates the ceiling below.
Address the speed bag platform.
The speed bag platform is often the noisiest piece of equipment because the bag strikes the platform on every rebound, creating a sharp, repetitive impact. The platform itself acts as a sounding board, amplifying the noise into the wall. To mitigate this, mount the platform with rubber isolation washers between the bracket and the wall, and consider adding a thin layer of closed-cell foam tape along the contact points. Some platforms come with built-in rubber bumpers on the underside, if yours does not, you can add self-adhesive rubber pads to dampen the impact. The Fold Away Speed Bag Platform at $143.99 solves space constraints by folding flush against the wall when not in use, with six adjustable height levels, but even this benefits from isolation washers at the mounting points.
Use mass-loaded vinyl for walls and floors.
If you have a dedicated training room, hanging mass-loaded vinyl (MLV) barrier on the walls and under the flooring can dramatically reduce sound transmission. MLV is a dense, flexible material that blocks sound waves and adds mass to walls, reducing their ability to vibrate. A 1-pound-per-square-foot MLV layer installed behind drywall or over existing walls can cut structure-borne noise by 10 to 15 decibels (acoustics.org). For floors, lay MLV beneath your interlocking tiles to create a decoupled barrier between your training surface and the subfloor. This is a more involved installation, but for serious home gyms in shared buildings, it is the most effective solution.
Schedule smart, not just quiet.
Timing also matters. Schedule heavy bag work during daytime hours when neighbors are less likely to be home, and reserve early morning or late evening sessions for shadow boxing, resistance bands, and jump rope work that generates minimal noise. But consider the direction of noise: if your neighbor below works nights and sleeps during the day, your 'quiet' afternoon session might still be disruptive. Talk to your neighbors, explain what you are doing, and agree on windows of time that work for everyone. A little communication goes further than any amount of rubber matting.
Maintaining Your Combat Training Equipment for Longevity
Combat training equipment takes a beating, and maintenance determines whether your gear lasts five years or five months. Most equipment failures come from neglect, not manufacturing defects. A simple monthly maintenance routine prevents the vast majority of problems. Start by inspecting all mounting hardware, checking for loose bolts, worn D rings, or frayed straps that could fail mid-session.
For leather and synthetic leather bags, wipe down the surface after each session to remove sweat and oils that degrade the material over time. Condition the surface every few months with a leather conditioner designed for sports equipment. Poly canvas bags require less maintenance but still benefit from periodic cleaning to prevent odor buildup. Check the bag's filling annually for compaction or settling that creates uneven striking surfaces. If the bag develops soft spots or the filling settles to the bottom, it needs professional refilling or replacement.
Conclusion: Build Your Home Combat Training Setup
Building a home combat training setup requires balancing your training goals with your physical space and noise constraints. Start with a commercial-grade heavy bag that matches your height and training style, pair it with proper mounting hardware and protective mats, then add conditioning tools to round out your sessions. The Panama 45D Heavy Punching Bag delivers the durability and stability serious training demands, backed by free shipping and a 100% refund policy for defective items. Combat Build Supply ensures every session goes smoothly with premium customer support via live chat, email, or phone. Sign Up Now! to start building a setup that supports your skill development for years to come.
Frequently Asked Questions
How much space do I need for a home combat training setup?
For a dedicated heavy bag setup, you need a minimum of 6 x 6 feet of floor space. For a full setup that includes a bag, mats, and space for shadow boxing or drills, plan for an area of at least 10 x 10 feet. Crucially, you need 2 to 3 feet of clearance around the bag for movement. If space is tight, consider a fold-away speed bag platform or a freestanding bag that can be stored when not in use.
Should I choose a heavy bag or a freestanding bag for my home?
A traditional heavy bag is best for developing power, accuracy, and combinations because it offers a consistent striking surface and allows for movement around it. A freestanding bag is more convenient for apartments or rooms where you cannot mount a bag to the ceiling, but it often has more give and can shift with hard kicks. For serious boxing or Muay Thai training, a heavy bag is the superior choice. For casual fitness or limited space, a freestanding bag is a practical alternative.
What safety gear is essential for home combat training?
Hand wraps and quality boxing gloves are non-negotiable for any bag work to protect your knuckles and wrists. Shin guards are essential if you plan to kick the heavy bag. A mouthguard is critical for sparring or any partner drills. Also, ensure you have proper flooring, like interlocking martial arts mats, to protect your joints and provide traction. Never train on hard concrete or carpet without protective padding.
How do I choose the right size heavy bag for my home gym?
Your height and training style determine the right bag size. For general boxing, a 120 cm bag (50-55 kg) is suitable for lighter or shorter practitioners. A 150 cm bag (60-65 kg) is a versatile standard for most adults. Taller fighters or those focusing on kicks and knees should opt for a 180 cm bag (70-75 kg), like the Panama 45D. Heavier bags also offer more stability and resistance, which builds more power.
Can I effectively train martial arts at home with just equipment?
Yes, you can effectively train striking arts like boxing, Muay Thai, and kickboxing at home. A heavy bag allows you to practice combinations, power, and cardio. However, you will miss the live feedback and timing developed through sparring with a partner. To improve technique, drill specific movements slowly and record yourself to analyze your form. Consider supplementing with online classes for structured guidance.


